File management for 3D motion designers? Meh.
Before you go, picture this: You're a mad scientist, ready to breathe life into your next creation.
But instead of a sleek lab, you're stuck in a cluttered garage, spending more time searching for tools than working your magic. And if something goes wrong - BOOM! - your work is toast.
That's what it's like without proper file management…
Fear not! I’m here to help you turn that mess into a streamlined workspace.
In this blog post, we'll explore file management for 3D motion designers, diving into best practices for:
- folder structures
- file naming
- back-ups
- archiving
- & more!
By the end, you'll have a foolproof system that'll leave you with peace of mind and more time for creativity.
So, let's roll up our sleeves and dive into the world of file management. It's time to show those files who's boss!
Mastering Folder Structures
Now picture yourself as a file-fu master, gracefully manoeuvring through a sea of files and folders, each perfectly organised and in its rightful place.
Implementing file management in 3D motion design can greatly improve organisation, security and efficiency in your workflow.
With these tips, you'll transform your digital chaos into a zen garden.
Simplicity is key
Don't create a digital rabbit hole.
Avoid nesting folders inside folders, inside folders. You’ll end up wasting more time than if you didn’t organise your files at all.
Mastering file management for 3D motion designers begins with establishing a clean, straightforward folder structure that allows you to access your files quickly.
Having an output folder in the root for all renders and intermediate files has been a game-changer for me.
This allows for quick access and keeps all your outputs in one place. Nice!
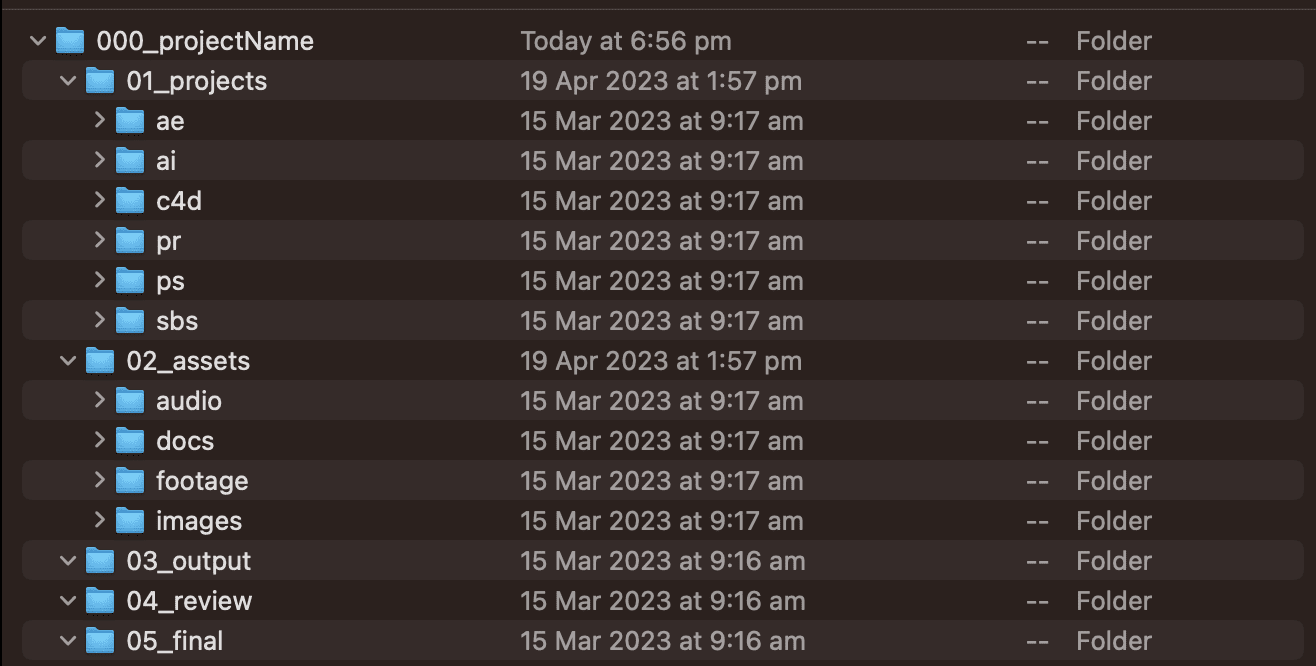
Here is the folder structure I use:
Goldilocks naming convention
Nail the perfect balance in file names – short enough to scan, yet descriptive enough to know what's inside.
Here is an example of a project file naming convention:
<project number>_<short name>_prj_v<version number>
Components of the naming convention:
- Project number: A unique identifier for the project (e.g., 001, 002, etc.)
- Short name: A brief, descriptive title for the project (e.g., "logo_animation")
- Prefix: A label to identify the type of file, such as "prj" for project files, "seq" for sequences, and "tex" for texture files.
- Version number: A two-digit version number that increments with each save (e.g., v01, v02, etc.)
Here's an example of a fully formed file name:
001_logo_animation_prj_v01
Additionally, some people like to add dates, I don’t think this is necessary though.
Automate your folder structure creation
Why manually create folders when you can be a techno-wizard?
Use a tool like Post Haste or Anchorpoint, which will allow you to set up custom folder structure templates and automatically renames project files for you.
Or simply have a folder structure template ready to copy and paste.
Clone your project files
Protect your work by creating versioned copies of your project files (v1, v2, etc.). It's like a time machine for your designs.
This approach has several benefits:
- Backup: By saving multiple versions of your work, you create a safety net in case of file corruption, accidental deletion, or other unexpected problems.
- Iteration: Preserve the history of your design process, allowing you to revisit previous stages or repurpose elements from earlier versions.
- Collaboration: Enable smoother collaboration with team members by tracking changes and sharing specific versions with clients or colleagues.
- Learning: Analyse your design evolution and improve your skills by reviewing past iterations.
Anchorpoint, mentioned before, also offers version control for your motion design project files.
If you decide to do it manually, organise your project file back-ups into a dedicated folder.
Most software gives you the option to save project files incrementally. Make a habit of doing that every few hours or at least once a day.
If you are making significant changes, it’s a good idea to make an incremental save before!
Note that cloning your project files is an addition to auto-saves, not a replacement.
Harness the power of render tokens
When it comes to file management for 3D motion designers, harnessing the power of render tokens can save time and automate file naming.
Render tokens are placeholders that automatically populate with specific information when rendering your projects.
By incorporating them into your file management system, you can:
- Automate file naming: Render tokens generate file names based on project information, ensuring consistency and reducing manual input.
- Save time: Spend less time managing your render outputs and more time focusing on your design work.
- Organise output files: Automatically sort your rendered files into appropriate folders, making it easier to locate and review your work.
Here is the one I use in Cinema 4D, which I have saved as part of my default scene:
../../03_output/$prj/$prj
This render token creates the following behaviour:
- Output folder: Renders are saved in the "03_output" folder located at the root of your project. Two folders up from the project file, in this case.
- File naming: The rendered file's name is automatically generated based on the name of your Cinema 4D project file.
Most 3D software packages offer similar render token functionality, although the syntax may vary.
That’s a wrap for this part!
Embrace these file-fu principles, and you'll soon achieve file management enlightenment.
Dedicated Project SSD Synced With The Cloud
Think of your current projects as VIP passengers on a high-speed SSD train.
By separating project files from your OS and software, you're giving them the first-class treatment they deserve, all while improving performance. This separation helps to:
- Boost speed: Reduce loading times and improve responsiveness by storing your project files on a dedicated, high-performance drive.
- Enhance organization: Keep your project files separate from system files and applications for a cleaner, more organized workspace.
- Improve data security: Protect your work from potential system crashes or corruption by isolating your projects from your OS and software.
I recommend using an M.2 SDD with at least 1TB of data for your project drive.
Now let’s talk about securing that drive.
Secure Your Projects with Real-Time Cloud Sync
For 3D motion designers, real-time cloud sync is essential for file management, ensuring that your projects are secure and easily accessible.
That’s what Dropbox offers.
Set your project drive to be your Dropbox directory, but make sure you have enough data allowance. You will need a paid plan to do this.
Apart from syncing your projects to the cloud, Dropbox is like a multitool for 3D motion designers, packed with features to keep your projects running smoothly.
- Version history: Easily revert to previous versions of your files or recover deleted items with Dropbox's version history feature.
- Shared folders: Collaborate seamlessly with team members and clients by sharing project folders and allowing multiple users to access and edit files.
- File transfer: Replace outdated and slow courier services with Dropbox's file transfer function, enabling quick and efficient delivery of your projects, as smoothly as expertly tossed pizza dough.
- Reviewing and feedback: Streamline the feedback process by leveraging Dropbox's new integrated reviewing function, offering a worthy alternative to platforms like frame.io.
Cloud Storage Showdown
Dropbox not your style?
Fear not, there's a cloud storage buffet to choose from, including Google Drive, Microsoft OneDrive, and Backblaze.
Check out this video for an exploration of different options for creatives:
So now you have your super drive setup and synced with the cloud.
What happens when that starts filling up and there’s no room for activities?
I’ll cover that next!
Archiving to a NAS
By moving your recently completed projects to a NAS, you'll free up space on your project drive while keeping them within arm's reach, just in case you need to revisit them before offloading to hard drives (we’ll cover that next).
A Network Attached Storage (NAS) system is ideal for archiving completed or inactive projects.
I use a Synology NAS, similar to this one:

But before you start archiving, make sure it’s set up with the right RAID configuration.
RAIDx
With the right RAID version, your NAS provides data redundancy, letting you rely on a single backup.
For a balance of redundancy and performance in a NAS, RAID 5 or RAID 6 are commonly recommended.
RAID 5 requires a minimum of three drives and provides data redundancy by using striping with parity. It can tolerate the failure of one drive without data loss.
RAID 6 requires a minimum of four drives and provides an even higher level of data redundancy by using striping with double parity. It can tolerate the failure of two drives without data loss.
Pick the RAID version based on needs: drive count, storage, performance, redundancy and the level of redundancy you need.
Using Checksums for File Transfers
When offloading finished projects to your NAS, it's crucial to use software that performs checksum verification, such as TeraCopy. Using checksum-enabled software offers several benefits:
- Data integrity: Checksums help to ensure that your project files remain intact during the transfer process, minimizing the risk of data corruption.
- Error detection: If any errors occur during the file transfer, checksum verification will detect the discrepancies, allowing you to address the issue promptly.
- Peace of mind: With checksum verification in place, you can have confidence that your valuable project files are securely archived and free of errors.
By incorporating checksum verification into your archiving process, you can maintain the integrity of your project files, protect your work from potential errors, and ensure that your 3D motion design projects are safely archived on your NAS system.
Archiving Adventure Checklist
Don't let your archiving journey turn into a chaotic scavenger hunt.
Follow this trusty checklist to keep things shipshape:
- [ ] Organise project folder
- [ ] Remove unused files
- [ ] Move files to the right folders
- [ ] Consolidate assets in project files
- [ ] Delete autosaves and backup project files (up to 5 versions down from last)
- [ ] Delete render previews
- [ ] Use TeraCopy to copy and checksum files to NAS
With your NAS time machine at the ready, you'll confidently cruise through your 3D motion design adventures, knowing that your past work is neatly organised and protected for future access.
But what happens when your NAS starts filling up?
That’s next!
Hard Drives for Old Data
3.5" Hard drives offer a practical, cost-effective storage solution for archiving older projects, freeing up valuable space on your Network Attached Storage (NAS) system.
3.5” HDD Benefits:
- Cost-effective: Save on the expense of expanding your NAS system.
- Space-saving: Free up space on your NAS for active projects and improve its performance.
- Practical: Acknowledge that revisiting old projects is an infrequent occurrence and prioritize current work.
- Secure: Always back up to two 3.5” drives and if you can keep one of them in a different location. And don’t forget about using a checksum verification!
HDD Dock – A Handy Tool for Hard Drive Access
HDD docks allow you to connect your hard drives to your computer with ease, making it simple to retrieve archived projects whenever necessary.
Here is a link to a good dock:

Some PC cases support a feature known as hot swapping, which enables you to swap hard drives without needing to power down your computer.
Labeler
Label your hard drives with clear and concise descriptions, making it easy to locate and access specific projects when required.
Investing in a label maker can streamline the process of labelling your hard drives.
I use a labeller like this one, which prints stickers that you can stick right onto your hard drives:

Project Management System
Use Notion or similar as your project management compass, adding information about where your projects are stored.
Read more about a project management system for 3D motion designers here:

Now let’s look at what to do when disaster strikes!
Disaster Recovery Plan
Imagine yourself as a freelance 3D motion designer with perfect file management dancing gracefully through a storm, unfazed by data loss or hardware failure.
With a solid disaster recovery plan, you'll navigate through challenges with confidence and resilience.
Key Components of an Effective Disaster Recovery Plan
To create a comprehensive disaster recovery plan, incorporate these essential elements:
- Hardware and software inventory: Keep an up-to-date list of your hardware and software, including license keys and warranty information.
- Clear communication channels: Establish reliable means of communication with clients and collaborators to keep everyone informed during a crisis.
- Emergency contacts: Maintain a list of essential contacts, such as tech support or hardware vendors, who can assist in case of a disaster.
- Step-by-step recovery procedures: Develop detailed instructions for restoring your data and resuming work as quickly as possible.
Rehearse, Revise, and Repeat
A well-executed emergency plan requires practice, and so does your disaster recovery plan.
Regularly test and update your plan to ensure you're always prepared to weather any crisis.
With a carefully crafted disaster recovery plan, you'll overcome challenges and prevent potential disasters, maintaining your peace of mind as you create spectacular 3D motion designs.
Embrace your expertise, and confidently manage your projects in the face of adversity!
Conclusion
And there you have it, fellow 3D motion designers, by adopting these file management best practices, you'll blast off to new heights of productivity, and stellar collaboration, and safeguard your work from data black holes.
Don't wait for a meteor shower of chaos to strike – strap on your space suit, fire up your thrusters, and optimize your file management system now.
With these celestial tips in your arsenal, you'll rocket towards peace of mind, ready to craft out-of-this-world visual masterpieces without any cosmic hiccups.